Starting a User Group: What You Need to Know

I have wanted to write this blog post for a long time. I finally found the time to do it. Below is my story of how I got involved with the UK Microsoft Community back in 2021 and how I started a user group. I’ll explain what I’ve learned in the process and what you should think about before you start your own group too. Here we go…

How it Started

I first got involved with the Microsoft Community in 2021 when I was fortunate to be a speaker at the very first South Coast Summit. I got ‘the bug,’ as some people say. I knew I wanted to help others in the community more. I wanted to share what I could to contribute to it and help it grow.

I had moved to Reading the same year and wanted to meet and network with others involved in the Dynamics 365 and Power Platform space where I lived. However, I found there was no user group at the time local to me so I reached out to the UK Dynamics 365 and Power Platform User Groups and asked to set up a local user group in Reading with the Group’s help.

Finding Your Team

Since starting the Reading user group in 2021, we have hosted 4 events a year. We had to change venue 3 times and faced several challenges (did you know vegan pizza comes uncut?). We learned a lot about hosting user group events in the process. I say ‘we’ as running a user group is not a one-person undertaking. It needs a community to get going and keep going.

As soon as word got out I was looking to start a Reading User Group, those in the community that knew people local to me (even if they didn’t know me personally) did what they could to help me find some willing supporters. This is one of many examples why this community and the people in it are so wonderful and I am still very grateful for this. I was lucky enough to meet Fraser Dear and Tim Leung who were as excited about starting the Reading User Group as I was and we became the organisers of the Reading User Group. Since then the team has expanded to include Ban Hasan!

The Reading UG Team!
From left to right: Fraser, Tim, me, Ban

With the support  of the UK Dynamics 365 and Power Platform User Groups we managed to secure a room at the Microsoft offices at Thames Valley Park. Local MVPs Chris Huntingford and Carl Cookson offered to be our first speakers and get the word out to promote our event – what a first speaker line up!

Not Everyone will Turn Up

As user groups are community events and often free to attendees (and the ones within the UK Dynamics 365 and Power Platform User Groups always are as we have annual sponsors), our Reading user group events were also completely free. We had over 50 people sign up for our first event and I was looking forward to meeting them all! I got to meet about 20 of them.

As I found out, with free events there is often a 40-50% drop out as people lose nothing by not showing up. I can’t tell you why people don’t update their RSVP status (don’t get me started). All I can tell you is that they don’t. Be prepared for this. Don’t be disheartened if you have a low number of sign ups and/or a low number of attendees for your first event. It takes time for the word to get out, no user group is a success overnight.

What You Need to Know

But there are things you can do to help it grow. Queue the Hints and Tips! These are broken down into the areas of:

  • Venue
  • Date and Time
  • Speakers
  • Attendees
  • Promotion
  • Communications
  • On the Day

If you remember one thing, make it this: This is supposed to be fun. Running a user group is not supposed to be a second unpaid job you have. If it starts feeling like that, ask for help!


Venue

When looking for a venue, consider:

  • Capacity – how big do you need your venue to be? Will you have an attendee limit?
  • Sponsor offices – if you have a sponsor(s), do they have a space that can be used free of charge?
  • Business Parks – Is there a local business park that can attract more attendees from the businesses hosted there?
  • Suitability – Does the venue have everything required for a user group (e.g. projector, chairs, tables for food)
  • Availability – does the venue have availability for the date(s) you are expecting to host the user group? (see tips for date/time below)
  • Cost – if the venue is not free of charge, is the cost within your cost limits?
  • Insurance – does the venue need the UG to have it’s own insurance?
  • Transport – Is the venue easy to get to using a variety of transport options? It will limit attendee numbers if not.
  • Parking – Does the venue have parking options/free parking nearby?
  • Accessibility – Is the venue easy to access for those with a disability?
  • Easy to find – Is the venue and room where the UG will be taking place easy to find? If not can you put signs/banners up?

Date and Time

When choosing the date and time of your user group, consider:

  • Local User Groups – do any of the other local user groups have an event close to that date or on that date? This will reduce attendees and available speakers.
  • Holidays – does the date fall on any important holiday dates that will make attendance lower – e.g. half term/school holidays for parents?
  • Religious Festivals – does the date fall during or close to a religious festival? Consider all faiths here.
  • UG Team – can everyone in your organizing team make the date and be there to support?
  • Timing – is the time of the event going to be convenient for attendees? E.g. Starting at 18:00 so people can get there after work or not finish too late for those that need to get back.
  • Duration – is the duration of the event enough to cover what is planned but not too long of a commitment for attendees? We usually have evening events last between 2-3 hours max.

Speakers

When looking for and engaging with speakers, consider:

Finding Speakers

  • The Community Network – The people you know in the community are part of a vast network of people and MVPs within the community that can be potential speakers – ask for help! Sessionize also has a speaker directory you can utilise.
  • Speaker Form – Make sure you set up a form that potential speakers can fill in to express their interest and promote it to your attendees through a QR code – they could be future speakers!
  • Session Details – Make sure you have a clear title and session description from potential speakers before selecting a session to verify the session is appropriate for the event. Discourage sessions that are to be product sales pitches unless they are an event sponsor.

Before the Event

  • Expenses – If you are not covering any speaker expenses make sure your speakers are clear on this before committing.
  • Slide Deck Template – if you have a slide deck template, encourage speakers to use it and at least have the sponsor slide in their presentations (if you have sponsors).
  • Event Details – Make sure speakers are clear on the exact location and timing of the event, particularly if the event is in person.
  • Accessibility – Make sure speakers have checked their slide deck for accessibility and have considered attendee requirements (e.g. having live captions for hearing-impaired attendees).
  • Speakers Sync Call – consider having a planning call with your speakers before the event to answer any questions they have and offer any support they need.
  • Promotion – Ask your speakers to post on their socials about the event. If they feel up to it maybe also to post a short video introducing themselves and their session. Extra points if they include a link to the speaker form and event registration to spread the word!

After the Event

  • Appreciation – Speakers spend a lot of time preparing their session, consider giving them a gift (e.g. box of chocolates) at the end as a token of appreciation for their efforts and for their involvement in the event. 
  • Photos – Take photos of the speakers as they are presenting and share them with them afterwards. Ask them to post on their socials about the experience and promote the next event (and to include a link to the speaker form!).

Attendees

Help attendees enjoy the experience!

  • Name Tags – As the organisers, consider wearing the same polos and name tags so you are easy to identify. Also offer attendees name tags (sticky labels always an easy option) to make networking easier.
  • Access/Dietary Requirements – It is worth using the functionality within MeetUp (or other platform of your choice) to ask attendees when registering whether they have any access or dietary requirements. This will allow you to consider these in advance and cater for what is needed.
  • Ice Breaker  –Consider having something to act as an ice breaker/help people network while people arrive (e.g. a round of Genius Square anyone?).
  • Swag – Official UG/Microsoft swag for your event (e.g. stickers!) can help promote the UG. This will also give your attendees something to take away with them.
  • Pizza Cutter – Only relevant if you are ordering pizza and someone has an allergy/dietary requirement. Consider having a pizza cutter specifically for this (e.g. gluten free/vegan pizzas) as they often come uncut.
  • Feedback – Consider creating a short feedback form and having a slide at the end with the feedback form QR code. This will help you understand how the event went and what you can do better next time.
A couple of the Reading UG members battling it out on Genius Square

Promotion

Spreading the word is vital.

  • Meetup – If you are using a platform like meetup for your event registrations, make sure you create and announce the event.
  • Microsoft Community – Set up your User Group within the Dynamics 365 and Power Platform community sites to drive awareness and list your events on there (with a link to meetup in the description if you are using that).
  • Socials – Consider setting up a Linkedin page for your user group and add your event on Linkedin as well. As people within the community to share/comment/repost to share the word! You can also set up a Whatsapp Community (or just a chat) to allow instant comms to those interested.

Communications

Before the event

  • 1 to 2 Weeks Before  –The date/time, venue, speakers may have changed since the event was announced so it’s worth sending a message with key information to those already registered for the event one or two weeks before it and asking them to update their RSVP if they can no longer attend.
  • Day Before – Final reminder for the event, asking them again to update their RSVP if they can no longer attend and providing any last-minute information, guidance, contact details for ‘on the day’.

After the event

  • Thank You Message – Message sent to all attendees that RSVPed (regardless of whether they attended or not) to thank those that managed to attend for joining and to encourage those that didn’t to join next time!  Give a link to the speakers’ LinkedIn profiles and promote the next event for them to sign up.

On the Day

The big day is here – all the excitement! But don’t forget….

  • Banners – If you have them, place them strategically so they help people find you.
  • Music – Consider bringing a Bluetooth speaker. Having music on as people come in creates a nice atmosphere! We have even had people from the community play a few songs live. You will be surprised at people’s hidden skills.
  • ‘Stuff’ – Refreshments/Ice breakers/Swag, make sure it’s all out there.
  • Slides Reel – Consider having a timed slide show that provides key info to attendees as they wait for the event to start (e.g. today’s agenda/timings, sponsor slide, next event registration QR code, info on the UG team, speaker form QR code).
  • Speakers – Make sure they have everything they need/happy with the set up, big them up if its their first time presenting!
  • Spread the Love – Consider having a closing slide at the end promoting other local UG events or community events your members might be interested in.
  • Have Fun – Take the time to enjoy it all, and if something doesn’t go to plan, there’s always next time. Just keep going!
Don’t forget to order (and label?) the food

So remember…

So as you can see, a lot of things to consider when looking to put a user group event together. This is why it is a team effort and why you shouldn’t try to do this alone. It is a lot of work. I promise you it’s worth it. You will see the difference it makes to the attendees, to the speakers and to you.

Good luck and keep me posted how you get on! I am cheering you on!

PowerAutomate, Dataverse and FetchXML: Advanced Filtering Made Easy

Ok a bit of a long title for this post but I genuinely couldn’t think of anything better, sometimes many words are needed! Here we go.

When using PowerAutomate and specifically the List Rows Dataverse action to find specific records, using FetchXML instead of (or in addition to!) an OData query in the Filter rows section can sometimes come in handy if you are looking to filter rows based on related tables. Let me explain :p

Imagine that you want to get all Account records in Dataverse that have active Contact records but specifically active Contact records that have an address in London, UK. This can be quite complex to create just using Filter rows and OData but there is an easy way to get what you need using FetchXML – and here is the good part: you don’t need to know anything about FetchXML to do it! You can use the familiar Advanced Find, yay! Here’s how it works…

In the Dataverse List Rows action there is an option to add a Fetch Xml query:

All you need to do is get the FetchXML and paste it in there, here’s how you get it. Firstly, select the Advanced Find icon and select the table you need to list rows for (in this example it would be the Accounts table):

You will then be presented with the Advanced Find filtering – add the filtering as required and then click on Download FetchXML:

A file will download with the FetchXML included in it – open the file and copy the whole FetchXML text:

Back in your cloud flow, paste it in the Fetch Xml query box, should look a bit like this:

That’s it! Your List Rows action will now give you only the accounts meeting the criteria you selected in the Advanced Find. Cool huh?

Happy PowerAutomate Dataverse Filtering 😀

The Power Automate and Dataverse Cheat Sheet

Back in June I presented at the UK Dynamics 365 and Power Platform User Group event in London (yey!) – the next one is in November, do join!

One of my sessions was a ‘101’ Intro to Power Automate and Dataverse. I wasn’t sure how many people would attend this session given that this isn’t a new shiny topic but I could imagine that outside the world of consultants, MVPs, techy wizards and general overachievers there were people with no background on this thing, just trying to make sense of how to use it and create flows, struggling to get past the errors and warnings and failures. We’ve all been there…

Thankfully many people turned up and asked a lot of follow up questions (yey!) and in the general speaker Q&A afterwards one of them raised a valid point – there is no one place that someone can go to and get a cheat sheet for the tiny little nuances of Power Automate – the things you only figure out through excessive online searching or through someone else who has ‘been there/done that’ and shows you the ropes. I figured I could at least have a stab at that and build on it over time with help and suggestions from you dear readers, so I promised I would do it.

So here you are – a Power Automate and Dataverse Cheat Sheet – lets be honest, sheets – version 1! Enjoy, and give me feedback – lets make this awesome!

PS: See here for some advanced filtering info you might find useful if that’s your thing!

Managed Environments vs Environments that are Managed
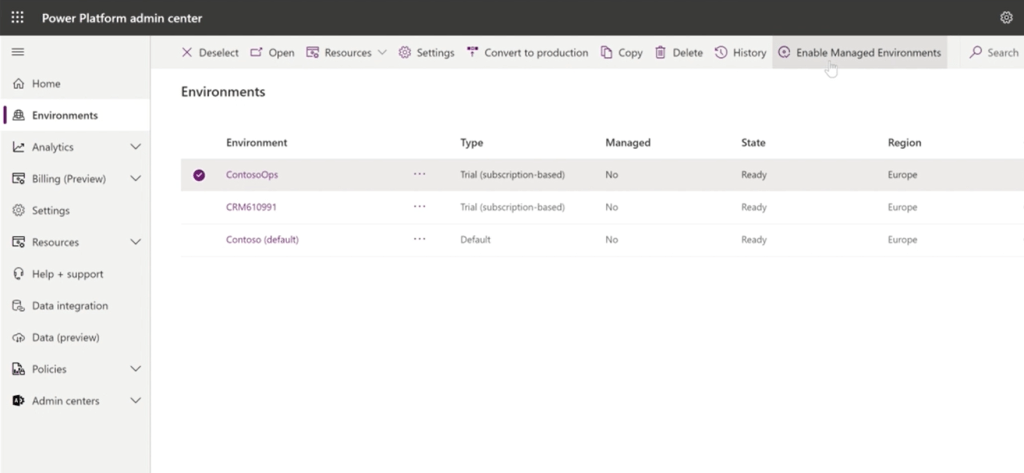
This is a fun one… I’m (probably?) late to the party on this one but I recently discovered that ‘managed environments’ are not the same thing as an environment that has managed solutions (as opposed to unmanaged solutions) in it. Colour me curious…

So it turns out that ‘Managed Environments is a suite of capabilities that allows admins to manage Power Platform at scale with more control, less effort, and more insights‘ – this definition is a bit vague so here’s a bit more information as to why ‘managed environments’ is not the same as environments that are managed (as in that have managed solutions). Enjoy…?

Environments that are Managed

Ok lets start with the easy stuff – before the whole ‘managed environments’ concept popped up, I would have referred to an environment that only contains managed solutions (E.g. Test/Production environments) as a ‘managed environment’ – as opposed to the Dev environment which only has unmanaged (editable) solutions in it so we can make changes, convert the unmanaged solution to managed (read only) and deploy the managed solution to the upward environments so no changes can be made to that solution’s components #changecontrol. Lovely. But then Microsoft decided to create the concept of ‘managed environments’ that is NOT that because… life just wasn’t complicated enough?

Managed Environments

So what are ‘managed environments’ then? In simple terms, you can ‘enable’ any environment to be ‘managed’ which will allow you to do the following for it (for more details see the official Microsoft documentation here):

  • Limit (i.e. introduce restrictions) on how canvas apps can be shared
  • Get Weekly usage insights (number of apps used, top makers, most popular apps/flows etc)
  • View Data policies (which data policies are applied to the environment)
  • Set up Power Platform pipelines (in preview)

For more indepth information on this check out the following links:

Power Platform Managed Environments – Dynamics 365 FastTrack Architecture Insights

Managed Environments For Easier Governance – Power CAT Live

So in summary

If someone says ‘it is a managed environment’ you now have to clarify which of the two they mean. Yeeeeeey.

The Solution Architect’s Handbook

What is a solution architect? What does an architect do? Could I be an architect one day? Should I have a go at the PL600 solution architect exam? If you have asked yourself any of those questions, this post is for you.

I found myself in recent months asking myself the same thing. Officially (i.e. as far as ‘job titles’ are concerned) I was a principal consultant but I found my role mostly focused on the solution architecture side of things. In fact I would argue any consultant at any level will have touched on solution architecture without knowing it. Why? Because all the configuration/development we do, any design decisions we make are ultimately based on the project’s overall solution architecture. We do it all the time and we don’t even think about it. But we should…

What is a Solution Architect?

I used to think of solution architects as individuals who have all the certifications under the sun, are highly technical (i.e. are master developers/coders), integration wizards and could answer any question about absolutely anything you throw at them. Someone even once said to me that if you come from a functional background (as I do) you can’t call yourself a solution architect. Absolute Nonsence. Here is Microsoft’s definition of a solution architect:

‘A Solution Architect is responsible for the successful design, implementation, deployment, and adoption of an overall solution. A Solution Architect ensures that the solution meets the customer’s needs now and in the future. While the Solution Architect may not “click the buttons” during a deployment, they are ultimately responsible for the solution and work closely with the deployment team.’

So I call myself a solution architect because that is exactly what I do (also love clicking all the buttons)! Your background does not define what you can and can’t call yourself or do in the future.

But what do I not know?

My love for the Power Platform/Dynamics 365 runs deep and we’ve been in a relationship for over a decade now. It was time to make things official and start the prep for the PL600 Solution Architect exam. But did I know everything? Nope. Until 5 minutes ago (metaphorically) I didn’t even know I was doing it. It was time to read a book – and what better place to start than the Microsoft Power Platform Solution Architect’s Handbook by Hugo Herrera. It is what it says on the tin: An expert’s guide to becoming a Power Platform solution architect and preparing for the PL-600 exam.

Why buy/read a book?

I knew of Hugo/his book as we happened to work for the same consultancy but in different teams and he had a reputation for being a great architect and had done some quite complex projects so I was interested to see what another solution architect had to say about the topic and to find out what I didn’t know about solution architecture. I am also going through the Microsoft Learn online modules for the exam itself and I learn a lot from the online modules but nothing beats hands on experience.

Most of the book mentions things I knew already but every now and again something would get mentioned that I didn’t know (or thought I knew but didn’t) or was a better way of doing something. If you are already a solution architect you will still gain a lot from it and having a reference guide on your desk for areas you don’t often deal with is super handy. The index is also helpful for ‘dropping in’ on a topic and chapters can be consumed independently of each other.

You will gain even more if you are not a solution architect as having an understanding of solution architecture will make you a better consultant/system manager/user. Almost a third of the book is about discovery (workshops to gather requirements) and if you have never done that, it is valuable information on how to go about it (and what to look out for). I wish it had been around when I was starting out as a consultant and I recommend it to anyone in that position.

To exam or not to exam?

At the end of the book there are 35 sample questions for the PL600 exam/certification – you don’t have to be a solution architect to take the exam, equally you don’t have to take the exam at all. Having an understanding of what solution architecture is all about will always help you make better design decisions, whether you decide to get certified on the topic or not.

But remember…

The problem with books on any technology topic is that with each release information in them becomes more and more out of date. Always check the latest Microsoft guidance and also check out the book’s official list of errata (mistakes) – there is a particular section in chapter 14 that checks if you are actually paying attention as the screenshots don’t correspond to the topic which I actually did find rather amusing. There will always be a part of the project that doesn’t quite go to plan and that’s OK – as in projects, so in books!

Happy reading and, for the overachievers, good luck with the exam!

Are you a (User) Groupie?

Here is a question: Do you work with Dynamics 365/Power Platform or anything else in the Microsoft stack? If yes, are you part of your local user group? If not, gasp! I strongly encourage you to join your nearest local one. Here’s the top 3 reasons why…

  1. Keep your knowledge up to date: User groups are free to attendees and have great speakers that cover topics allowing you to stay up to date with updates or product areas you don’t get to work with often. Find out what you don’t know and learn about it all in one go.
  2. Find a friend: It is good to talk to people that don’t work with you and that have the same/similar role in another company. There are so many people that can relate to your work pain and may have some helpful tips/advice.
  3. It’s fun: there are real people in the flesh, there is free food and welcoming user group leaders you can talk to about anything and everyone is from the local area more or less. The meetings themselves don’t take too much of your time (couple of hours every quarter or so), they are informal so you can actually relax and you can chat to people that work in the same industry with similar products. It’s fun to get your geek on!

Recently there has been a hashtag that emerged in user group or MVP related posts: #CommunityRocks – although this is a bit twee for my liking, it is true – it is a community and it does rock. Be part of it – everyone has a lot to contribute and can help others in the same journey a few steps behind them. You can be a speaker at user group events or start one if there isn’t a local one near you. Regardless of what you do or want to do, here is the thing – everyone will try to help you, they will all really want to say yes. All you have to do is ask.

How do I get started?

Are you in a user group?

Funny you should ask! Yes – there wasn’t a local one near me so I did the right thing and set one up with the help of the team that looks after all UK user groups (see second link above), who have been awesome! I look after the D365/Power Platform user group in Reading with two other amazing people (Fraser Dear and Tim Leung), so if you are local and fancy joining check out our upcoming events here!

Cracking the JSON of Cloud Flows

Recently I had to do an analysis of a lookup field’s dependencies because it needed to be replaced by a new field looking up to a different table (itself a long story…).

It was all going well, I went into the Maker Portal, I found the table, found the field (sorry – column!), selected it and clicked ‘Show Dependencies’. Wonderful!

Except…

The dependencies list will only show you the cloud flows that use this field column as a trigger – not as a condition or action or anything else outside of the trigger. Which means that you are able to delete the field even if it means a bunch of flow actions will suddenly start failing because the thing doesn’t exist anymore. Where’s the fun in that….nowhere I tell you!

Soooo…what does this mean?

WELL. It basically means you have to search all cloud flows and see if any actions are using that field. Yep. I know. Thankfully there is an automated way to do this – don’t be that person that spends 2 weeks looking through flow actions #aintnobodygottimeforthat. Let JSON Crack do all the work for you! To learn more about JSON Crack in general and other ways to use it click here.

Using JSON Crack

It is super easy. First you need to get JSON from your environment of choice giving you all the (active, if you so wish) cloud flows in the system. You can do this by sticking the below in your browser – don’t forget to update it for your actual environment:

https://environmentname/api/data/v9.0/workflows?$select=clientdata,name&$filter=(category%20eq%205%20and%20statecode%20eq%201)

It will look like this – copy all the text. Ctrl + A, Ctrl + C is your friend.

Get Cracking

In a new tab (or the same tab, whatever makes you happy), go to https://jsoncrack.com/editor and on the left pane, delete what is there and paste the JSON from the API:

You will then see a wonderful long list of all the cloud flows on the right:

Here’s the good bit – you can use the Search Node box on the top right to look for the schema name of your field – this will search the JSON for any mention of this field in any of the flows which will get a green outline and you can press Enter to move to the next flow that mentions it:

You can also click on a flow to copy the details of it (e.g. name, id) and then open that flow in the Maker portal to see exactly where your field is used and make the necessary changes.

You can then repeat this process to ensure no more mentions of the field exist and then delete it.

Yey for JSON! This is a great tool for visualising JSON data in general so keep it in mind! Big thanks to Christy O’Kane for making me aware of this awesomeness!

Alternatively…

Top Tip by Cris Fernandez:

If you use Chrome, you can view and search this JSON within the browser tab by installing the JSON Formatter extension by Callum Locke. It will format the JSON for you (it will still be a wall of text but a structured wall of text!) and you can then use the browser search (Ctrl + F) to find the field schema. It will be quicker, show you all the places the field pops up, and exactly what has been found as a match in the JSON:

Woop Woop!

The Solution Checker and Process Flows Trick

I have been using the solution checker before any deployment of a solution as we all diligently should. A lot of the time there will be nothing in the results because it’s all good, yey!

Other times, the solution checker will provide useful info on things to be updated to ensure best practice or get overly eager on the use of ‘strict’ in JavaScript. Fun times.

But recently I had a situation where the solution checker was not able to do the one job it is supposed to. I got a lovely ‘Couldn’t be completed’ message which I was surprised by because my solution didn’t have anything particularly amazing in it that could trip it up and in over a year in that environment it had always done its job diligently.

Like all clever people, I googled my problems – see ‘Common issues and resolutions for solution checker’ – but none of that really applied. After a lot of trial and error, I figured it out… it was the business process flow! Let me explain…

Say you have a solution that has a number of things in it including, as it happens, a business process flow. The below screenshot is a solution that only has a ‘Opportunity to Order Process’ business process flow but the argument still stands whatever else you might have in there (good for you!):

So lets say you go and run the solution checker:

You might think in this basic scenario there isn’t much for the solution checker to complain about, but actually it will fail after about 30 seconds of giving it a go:

Sad times. So what’s the problem?

Here’s the fun fact – it appears that the solution checker can only complete a business process flow check if the solution it is checking also contains the table for the business process flow(s) in the solution. Without it/them, the checker won’t be able to do its job and it will fail. The good news is once you add the table like below…

…and then run the solution checker again, all will be groovy and you can then go view the results (if the solution checker finds anything to complain about).

As with many of life’s mysteries, I am not sure why the checker really needs the table there or why it can’t tell me it’s missing things it needs but there you go!