Starting a User Group: What You Need to Know

I have wanted to write this blog post for a long time. I finally found the time to do it. Below is my story of how I got involved with the UK Microsoft Community back in 2021 and how I started a user group. I’ll explain what I’ve learned in the process and what you should think about before you start your own group too. Here we go…

How it Started

I first got involved with the Microsoft Community in 2021 when I was fortunate to be a speaker at the very first South Coast Summit. I got ‘the bug,’ as some people say. I knew I wanted to help others in the community more. I wanted to share what I could to contribute to it and help it grow.

I had moved to Reading the same year and wanted to meet and network with others involved in the Dynamics 365 and Power Platform space where I lived. However, I found there was no user group at the time local to me so I reached out to the UK Dynamics 365 and Power Platform User Groups and asked to set up a local user group in Reading with the Group’s help.

Finding Your Team

Since starting the Reading user group in 2021, we have hosted 4 events a year. We had to change venue 3 times and faced several challenges (did you know vegan pizza comes uncut?). We learned a lot about hosting user group events in the process. I say ‘we’ as running a user group is not a one-person undertaking. It needs a community to get going and keep going.

As soon as word got out I was looking to start a Reading User Group, those in the community that knew people local to me (even if they didn’t know me personally) did what they could to help me find some willing supporters. This is one of many examples why this community and the people in it are so wonderful and I am still very grateful for this. I was lucky enough to meet Fraser Dear and Tim Leung who were as excited about starting the Reading User Group as I was and we became the organisers of the Reading User Group. Since then the team has expanded to include Ban Hasan!

The Reading UG Team!
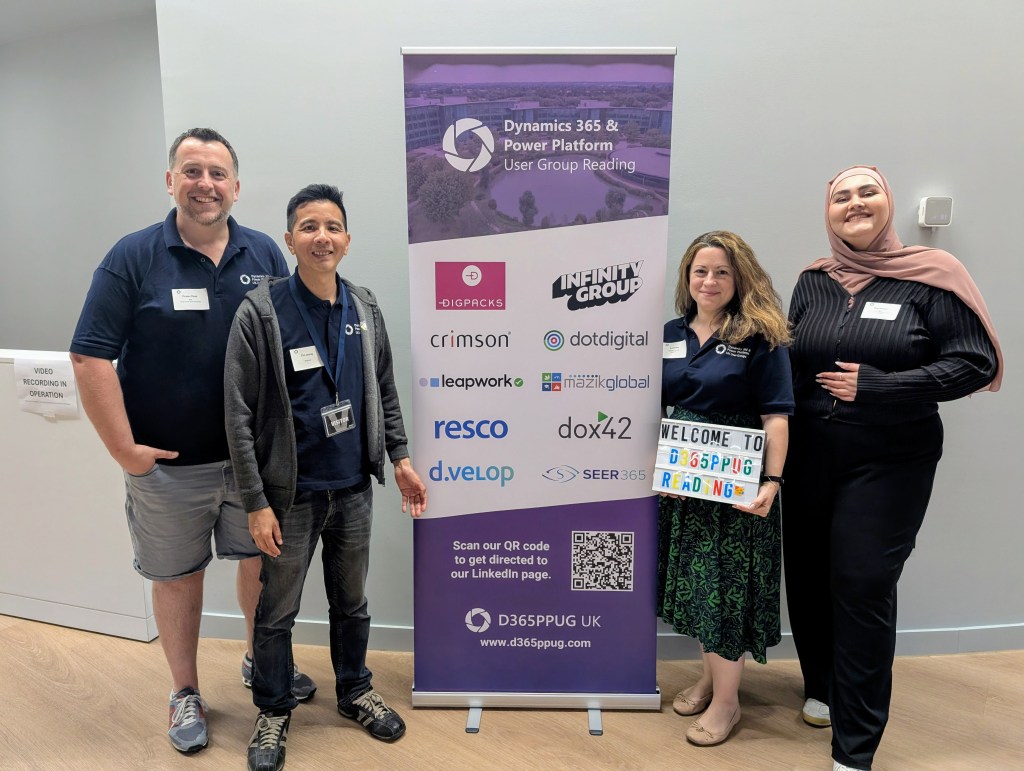
From left to right: Fraser, Tim, me, Ban

With the support  of the UK Dynamics 365 and Power Platform User Groups we managed to secure a room at the Microsoft offices at Thames Valley Park. Local MVPs Chris Huntingford and Carl Cookson offered to be our first speakers and get the word out to promote our event – what a first speaker line up!

Not Everyone will Turn Up

As user groups are community events and often free to attendees (and the ones within the UK Dynamics 365 and Power Platform User Groups always are as we have annual sponsors), our Reading user group events were also completely free. We had over 50 people sign up for our first event and I was looking forward to meeting them all! I got to meet about 20 of them.

As I found out, with free events there is often a 40-50% drop out as people lose nothing by not showing up. I can’t tell you why people don’t update their RSVP status (don’t get me started). All I can tell you is that they don’t. Be prepared for this. Don’t be disheartened if you have a low number of sign ups and/or a low number of attendees for your first event. It takes time for the word to get out, no user group is a success overnight.

What You Need to Know

But there are things you can do to help it grow. Queue the Hints and Tips! These are broken down into the areas of:

  • Venue
  • Date and Time
  • Speakers
  • Attendees
  • Promotion
  • Communications
  • On the Day

If you remember one thing, make it this: This is supposed to be fun. Running a user group is not supposed to be a second unpaid job you have. If it starts feeling like that, ask for help!


Venue

When looking for a venue, consider:

  • Capacity – how big do you need your venue to be? Will you have an attendee limit?
  • Sponsor offices – if you have a sponsor(s), do they have a space that can be used free of charge?
  • Business Parks – Is there a local business park that can attract more attendees from the businesses hosted there?
  • Suitability – Does the venue have everything required for a user group (e.g. projector, chairs, tables for food)
  • Availability – does the venue have availability for the date(s) you are expecting to host the user group? (see tips for date/time below)
  • Cost – if the venue is not free of charge, is the cost within your cost limits?
  • Insurance – does the venue need the UG to have it’s own insurance?
  • Transport – Is the venue easy to get to using a variety of transport options? It will limit attendee numbers if not.
  • Parking – Does the venue have parking options/free parking nearby?
  • Accessibility – Is the venue easy to access for those with a disability?
  • Easy to find – Is the venue and room where the UG will be taking place easy to find? If not can you put signs/banners up?

Date and Time

When choosing the date and time of your user group, consider:

  • Local User Groups – do any of the other local user groups have an event close to that date or on that date? This will reduce attendees and available speakers.
  • Holidays – does the date fall on any important holiday dates that will make attendance lower – e.g. half term/school holidays for parents?
  • Religious Festivals – does the date fall during or close to a religious festival? Consider all faiths here.
  • UG Team – can everyone in your organizing team make the date and be there to support?
  • Timing – is the time of the event going to be convenient for attendees? E.g. Starting at 18:00 so people can get there after work or not finish too late for those that need to get back.
  • Duration – is the duration of the event enough to cover what is planned but not too long of a commitment for attendees? We usually have evening events last between 2-3 hours max.

Speakers

When looking for and engaging with speakers, consider:

Finding Speakers

  • The Community Network – The people you know in the community are part of a vast network of people and MVPs within the community that can be potential speakers – ask for help! Sessionize also has a speaker directory you can utilise.
  • Speaker Form – Make sure you set up a form that potential speakers can fill in to express their interest and promote it to your attendees through a QR code – they could be future speakers!
  • Session Details – Make sure you have a clear title and session description from potential speakers before selecting a session to verify the session is appropriate for the event. Discourage sessions that are to be product sales pitches unless they are an event sponsor.

Before the Event

  • Expenses – If you are not covering any speaker expenses make sure your speakers are clear on this before committing.
  • Slide Deck Template – if you have a slide deck template, encourage speakers to use it and at least have the sponsor slide in their presentations (if you have sponsors).
  • Event Details – Make sure speakers are clear on the exact location and timing of the event, particularly if the event is in person.
  • Accessibility – Make sure speakers have checked their slide deck for accessibility and have considered attendee requirements (e.g. having live captions for hearing-impaired attendees).
  • Speakers Sync Call – consider having a planning call with your speakers before the event to answer any questions they have and offer any support they need.
  • Promotion – Ask your speakers to post on their socials about the event. If they feel up to it maybe also to post a short video introducing themselves and their session. Extra points if they include a link to the speaker form and event registration to spread the word!

After the Event

  • Appreciation – Speakers spend a lot of time preparing their session, consider giving them a gift (e.g. box of chocolates) at the end as a token of appreciation for their efforts and for their involvement in the event. 
  • Photos – Take photos of the speakers as they are presenting and share them with them afterwards. Ask them to post on their socials about the experience and promote the next event (and to include a link to the speaker form!).

Attendees

Help attendees enjoy the experience!

  • Name Tags – As the organisers, consider wearing the same polos and name tags so you are easy to identify. Also offer attendees name tags (sticky labels always an easy option) to make networking easier.
  • Access/Dietary Requirements – It is worth using the functionality within MeetUp (or other platform of your choice) to ask attendees when registering whether they have any access or dietary requirements. This will allow you to consider these in advance and cater for what is needed.
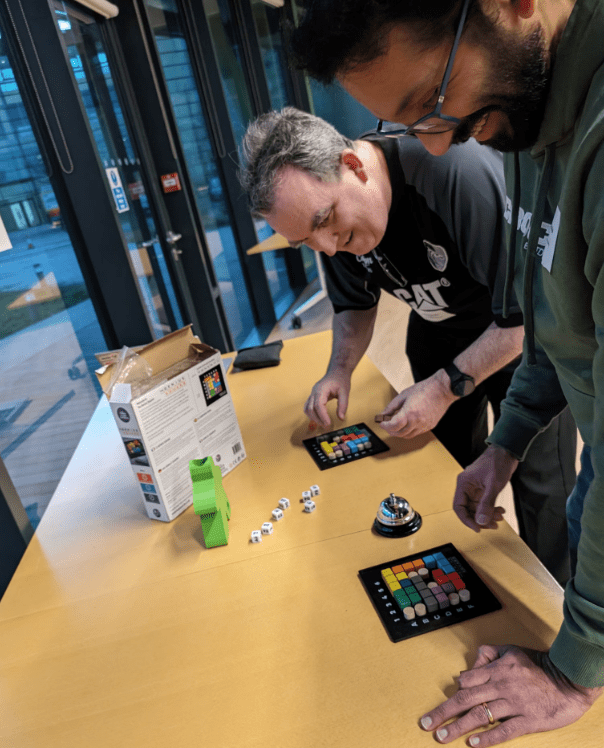
  • Ice Breaker  –Consider having something to act as an ice breaker/help people network while people arrive (e.g. a round of Genius Square anyone?).
  • Swag – Official UG/Microsoft swag for your event (e.g. stickers!) can help promote the UG. This will also give your attendees something to take away with them.
  • Pizza Cutter – Only relevant if you are ordering pizza and someone has an allergy/dietary requirement. Consider having a pizza cutter specifically for this (e.g. gluten free/vegan pizzas) as they often come uncut.
  • Feedback – Consider creating a short feedback form and having a slide at the end with the feedback form QR code. This will help you understand how the event went and what you can do better next time.
A couple of the Reading UG members battling it out on Genius Square

Promotion

Spreading the word is vital.

  • Meetup – If you are using a platform like meetup for your event registrations, make sure you create and announce the event.
  • Microsoft Community – Set up your User Group within the Dynamics 365 and Power Platform community sites to drive awareness and list your events on there (with a link to meetup in the description if you are using that).
  • Socials – Consider setting up a Linkedin page for your user group and add your event on Linkedin as well. As people within the community to share/comment/repost to share the word! You can also set up a Whatsapp Community (or just a chat) to allow instant comms to those interested.

Communications

Before the event

  • 1 to 2 Weeks Before  –The date/time, venue, speakers may have changed since the event was announced so it’s worth sending a message with key information to those already registered for the event one or two weeks before it and asking them to update their RSVP if they can no longer attend.
  • Day Before – Final reminder for the event, asking them again to update their RSVP if they can no longer attend and providing any last-minute information, guidance, contact details for ‘on the day’.

After the event

  • Thank You Message – Message sent to all attendees that RSVPed (regardless of whether they attended or not) to thank those that managed to attend for joining and to encourage those that didn’t to join next time!  Give a link to the speakers’ LinkedIn profiles and promote the next event for them to sign up.

On the Day

The big day is here – all the excitement! But don’t forget….

  • Banners – If you have them, place them strategically so they help people find you.
  • Music – Consider bringing a Bluetooth speaker. Having music on as people come in creates a nice atmosphere! We have even had people from the community play a few songs live. You will be surprised at people’s hidden skills.
  • ‘Stuff’ – Refreshments/Ice breakers/Swag, make sure it’s all out there.
  • Slides Reel – Consider having a timed slide show that provides key info to attendees as they wait for the event to start (e.g. today’s agenda/timings, sponsor slide, next event registration QR code, info on the UG team, speaker form QR code).
  • Speakers – Make sure they have everything they need/happy with the set up, big them up if its their first time presenting!
  • Spread the Love – Consider having a closing slide at the end promoting other local UG events or community events your members might be interested in.
  • Have Fun – Take the time to enjoy it all, and if something doesn’t go to plan, there’s always next time. Just keep going!
Don’t forget to order (and label?) the food

So remember…

So as you can see, a lot of things to consider when looking to put a user group event together. This is why it is a team effort and why you shouldn’t try to do this alone. It is a lot of work. I promise you it’s worth it. You will see the difference it makes to the attendees, to the speakers and to you.

Good luck and keep me posted how you get on! I am cheering you on!

Managed Environments vs Environments that are Managed

This is a fun one… I’m (probably?) late to the party on this one but I recently discovered that ‘managed environments’ are not the same thing as an environment that has managed solutions (as opposed to unmanaged solutions) in it. Colour me curious…

So it turns out that ‘Managed Environments is a suite of capabilities that allows admins to manage Power Platform at scale with more control, less effort, and more insights‘ – this definition is a bit vague so here’s a bit more information as to why ‘managed environments’ is not the same as environments that are managed (as in that have managed solutions). Enjoy…?

Environments that are Managed

Ok lets start with the easy stuff – before the whole ‘managed environments’ concept popped up, I would have referred to an environment that only contains managed solutions (E.g. Test/Production environments) as a ‘managed environment’ – as opposed to the Dev environment which only has unmanaged (editable) solutions in it so we can make changes, convert the unmanaged solution to managed (read only) and deploy the managed solution to the upward environments so no changes can be made to that solution’s components #changecontrol. Lovely. But then Microsoft decided to create the concept of ‘managed environments’ that is NOT that because… life just wasn’t complicated enough?

Managed Environments

So what are ‘managed environments’ then? In simple terms, you can ‘enable’ any environment to be ‘managed’ which will allow you to do the following for it (for more details see the official Microsoft documentation here):

  • Limit (i.e. introduce restrictions) on how canvas apps can be shared
  • Get Weekly usage insights (number of apps used, top makers, most popular apps/flows etc)
  • View Data policies (which data policies are applied to the environment)
  • Set up Power Platform pipelines (in preview)

For more indepth information on this check out the following links:

Power Platform Managed Environments – Dynamics 365 FastTrack Architecture Insights

Managed Environments For Easier Governance – Power CAT Live

So in summary

If someone says ‘it is a managed environment’ you now have to clarify which of the two they mean. Yeeeeeey.

The Solution Architect’s Handbook

What is a solution architect? What does an architect do? Could I be an architect one day? Should I have a go at the PL600 solution architect exam? If you have asked yourself any of those questions, this post is for you.

I found myself in recent months asking myself the same thing. Officially (i.e. as far as ‘job titles’ are concerned) I was a principal consultant but I found my role mostly focused on the solution architecture side of things. In fact I would argue any consultant at any level will have touched on solution architecture without knowing it. Why? Because all the configuration/development we do, any design decisions we make are ultimately based on the project’s overall solution architecture. We do it all the time and we don’t even think about it. But we should…

What is a Solution Architect?

I used to think of solution architects as individuals who have all the certifications under the sun, are highly technical (i.e. are master developers/coders), integration wizards and could answer any question about absolutely anything you throw at them. Someone even once said to me that if you come from a functional background (as I do) you can’t call yourself a solution architect. Absolute Nonsence. Here is Microsoft’s definition of a solution architect:

‘A Solution Architect is responsible for the successful design, implementation, deployment, and adoption of an overall solution. A Solution Architect ensures that the solution meets the customer’s needs now and in the future. While the Solution Architect may not “click the buttons” during a deployment, they are ultimately responsible for the solution and work closely with the deployment team.’

So I call myself a solution architect because that is exactly what I do (also love clicking all the buttons)! Your background does not define what you can and can’t call yourself or do in the future.

But what do I not know?

My love for the Power Platform/Dynamics 365 runs deep and we’ve been in a relationship for over a decade now. It was time to make things official and start the prep for the PL600 Solution Architect exam. But did I know everything? Nope. Until 5 minutes ago (metaphorically) I didn’t even know I was doing it. It was time to read a book – and what better place to start than the Microsoft Power Platform Solution Architect’s Handbook by Hugo Herrera. It is what it says on the tin: An expert’s guide to becoming a Power Platform solution architect and preparing for the PL-600 exam.

Why buy/read a book?

I knew of Hugo/his book as we happened to work for the same consultancy but in different teams and he had a reputation for being a great architect and had done some quite complex projects so I was interested to see what another solution architect had to say about the topic and to find out what I didn’t know about solution architecture. I am also going through the Microsoft Learn online modules for the exam itself and I learn a lot from the online modules but nothing beats hands on experience.

Most of the book mentions things I knew already but every now and again something would get mentioned that I didn’t know (or thought I knew but didn’t) or was a better way of doing something. If you are already a solution architect you will still gain a lot from it and having a reference guide on your desk for areas you don’t often deal with is super handy. The index is also helpful for ‘dropping in’ on a topic and chapters can be consumed independently of each other.

You will gain even more if you are not a solution architect as having an understanding of solution architecture will make you a better consultant/system manager/user. Almost a third of the book is about discovery (workshops to gather requirements) and if you have never done that, it is valuable information on how to go about it (and what to look out for). I wish it had been around when I was starting out as a consultant and I recommend it to anyone in that position.

To exam or not to exam?

At the end of the book there are 35 sample questions for the PL600 exam/certification – you don’t have to be a solution architect to take the exam, equally you don’t have to take the exam at all. Having an understanding of what solution architecture is all about will always help you make better design decisions, whether you decide to get certified on the topic or not.

But remember…

The problem with books on any technology topic is that with each release information in them becomes more and more out of date. Always check the latest Microsoft guidance and also check out the book’s official list of errata (mistakes) – there is a particular section in chapter 14 that checks if you are actually paying attention as the screenshots don’t correspond to the topic which I actually did find rather amusing. There will always be a part of the project that doesn’t quite go to plan and that’s OK – as in projects, so in books!

Happy reading and, for the overachievers, good luck with the exam!

Are you a (User) Groupie?

Here is a question: Do you work with Dynamics 365/Power Platform or anything else in the Microsoft stack? If yes, are you part of your local user group? If not, gasp! I strongly encourage you to join your nearest local one. Here’s the top 3 reasons why…

  1. Keep your knowledge up to date: User groups are free to attendees and have great speakers that cover topics allowing you to stay up to date with updates or product areas you don’t get to work with often. Find out what you don’t know and learn about it all in one go.
  2. Find a friend: It is good to talk to people that don’t work with you and that have the same/similar role in another company. There are so many people that can relate to your work pain and may have some helpful tips/advice.
  3. It’s fun: there are real people in the flesh, there is free food and welcoming user group leaders you can talk to about anything and everyone is from the local area more or less. The meetings themselves don’t take too much of your time (couple of hours every quarter or so), they are informal so you can actually relax and you can chat to people that work in the same industry with similar products. It’s fun to get your geek on!

Recently there has been a hashtag that emerged in user group or MVP related posts: #CommunityRocks – although this is a bit twee for my liking, it is true – it is a community and it does rock. Be part of it – everyone has a lot to contribute and can help others in the same journey a few steps behind them. You can be a speaker at user group events or start one if there isn’t a local one near you. Regardless of what you do or want to do, here is the thing – everyone will try to help you, they will all really want to say yes. All you have to do is ask.

How do I get started?

Are you in a user group?

Funny you should ask! Yes – there wasn’t a local one near me so I did the right thing and set one up with the help of the team that looks after all UK user groups (see second link above), who have been awesome! I look after the D365/Power Platform user group in Reading with two other amazing people (Fraser Dear and Tim Leung), so if you are local and fancy joining check out our upcoming events here!

Cracking the JSON of Cloud Flows

Recently I had to do an analysis of a lookup field’s dependencies because it needed to be replaced by a new field looking up to a different table (itself a long story…).

It was all going well, I went into the Maker Portal, I found the table, found the field (sorry – column!), selected it and clicked ‘Show Dependencies’. Wonderful!

Except…

The dependencies list will only show you the cloud flows that use this field column as a trigger – not as a condition or action or anything else outside of the trigger. Which means that you are able to delete the field even if it means a bunch of flow actions will suddenly start failing because the thing doesn’t exist anymore. Where’s the fun in that….nowhere I tell you!

Soooo…what does this mean?

WELL. It basically means you have to search all cloud flows and see if any actions are using that field. Yep. I know. Thankfully there is an automated way to do this – don’t be that person that spends 2 weeks looking through flow actions #aintnobodygottimeforthat. Let JSON Crack do all the work for you! To learn more about JSON Crack in general and other ways to use it click here.

Using JSON Crack

It is super easy. First you need to get JSON from your environment of choice giving you all the (active, if you so wish) cloud flows in the system. You can do this by sticking the below in your browser – don’t forget to update it for your actual environment:

https://environmentname/api/data/v9.0/workflows?$select=clientdata,name&$filter=(category%20eq%205%20and%20statecode%20eq%201)

It will look like this – copy all the text. Ctrl + A, Ctrl + C is your friend.

Get Cracking

In a new tab (or the same tab, whatever makes you happy), go to https://jsoncrack.com/editor and on the left pane, delete what is there and paste the JSON from the API:

You will then see a wonderful long list of all the cloud flows on the right:

Here’s the good bit – you can use the Search Node box on the top right to look for the schema name of your field – this will search the JSON for any mention of this field in any of the flows which will get a green outline and you can press Enter to move to the next flow that mentions it:

You can also click on a flow to copy the details of it (e.g. name, id) and then open that flow in the Maker portal to see exactly where your field is used and make the necessary changes.

You can then repeat this process to ensure no more mentions of the field exist and then delete it.

Yey for JSON! This is a great tool for visualising JSON data in general so keep it in mind! Big thanks to Christy O’Kane for making me aware of this awesomeness!

Alternatively…

Top Tip by Cris Fernandez:

If you use Chrome, you can view and search this JSON within the browser tab by installing the JSON Formatter extension by Callum Locke. It will format the JSON for you (it will still be a wall of text but a structured wall of text!) and you can then use the browser search (Ctrl + F) to find the field schema. It will be quicker, show you all the places the field pops up, and exactly what has been found as a match in the JSON:

Woop Woop!

Polymorphic Lookups and Where to Find Them

Oh Look! Tables!

Lets start at the beginning – lookup fields you probably know (a field (column) in one table that looks up to another table like a field on a Contact record that allows you to select an Account record as the ‘Employer’ for example) but what is this fancy ‘polymorphic’ thing? WELL. You’re in for a treat.

Polymorphism Explained

A polymorphic lookup field is a lookup field that allows you to select a record from more than one table therefore ‘morphing’ into many (poly!) tables. What can I say, it sounds fancier than ‘Multi-Table Lookup’ so there.

These fields exist out of the box in many places like the Appointment form for example – if you take a look at the ‘Optional Attendees’ you can see it is looking at 5 different types of records (i.e. 5 different tables). Congrats, you polymorphed!

How to Create One

You will be forgiven for thinking you can’t create such fields as you can’t create one through the maker portal (yet!) – only a standard (link to a single table) lookup or a Customer lookup giving you the ability to link to the Contact/Account tables exists:

Buuuuut…. you can create (and manage) one through the wonderful XrmToolbox using the Polymorphic Lookup Creator tool created by Tanguy Touzard! Power to the C#!

My guess is that in one of the future releases this functionality will pop up as polymorphic lookups are extremely useful – but until that day, proceed with caution. As this is a third party application, this isn’t fully/officially/100% supported or incorporated into out of the box functionality as you might expect.

What you need to do

The Polymorphic Lookup Creator tool is very easy to use – just remember that the ‘greyed out’ fields are actually editable and you’ll be fine 🙂 Below I am creating a new field on the Contact called ‘Affected By’ where I want to select a record from either the Opportunity, Quote or Product table.

On the left I have selected the solution I want the field created in, which table it should be created in, what I want to do (create a new field), the display name, schema name and finally I can tick the tables I want made available for it. By selecting a table from the list you can also see the details of the relationship to be created on the right and amend this as needed.

Once you are ready, click on the ‘Create Polymorphic Lookup’ button on the top right and, as Tanguy would say, Voila! Once the field has been created you will get a confirmation message and you can then see it in the maker portal within the solution and table you selected:

But Beware…

There are a few things that will not be what they seem – consider each of these carefully:

  1. The Maker Portal will lie to you

If you look at the field within the solution in the maker portal, even though it is polymorphic it will look like a normal lookup field linked to only the first table so you will have no idea or indication it is indeed a polymorphic one (so document your polymorphic lookups, make sure eeeveryone knows about it!):

2. Your solution import might fail

When the tool creates the new polymorphic lookup in your solution, it will add the field and its relationships as well as the related tables and their relationships to the solution (all good so far). The problem is that if the tables are not flagged in the solution to include their metadata, the relationship metadata won’t be part of the solution and the whole thing will fall over due to missing dependencies (not so good). If you have this problem you will need to remove and re-add the tables to the solution and don’t forget to tick the all important tick box in the process:

3. You will need to use the XrmToolBox to add/remove tables

Following on from point 1 above, you won’t be able to use the maker portal to make any changes to the field’s tables – you will need to open the field through the Polymorphic Lookup Creator tool, make any changes you need (be aware of data stored in the system if you remove a table from the list of selected tables) and then click on ‘Apply Changes’ at the top (or Delete to remove it all together – make sure no dependencies exist):

4. Cloud Flows will need Switching

If you do wish to use a polymorphic lookup in a cloud flow to get data or otherwise, be prepared for the use of the ‘Switch’ control based on the table the associated record is from before you can do anything else with it. There is a limit of 25 switches but in all honesty I would really worry about you if you create a polymorphic lookup that uses more then 5 tables let alone 25…

5. Polymorphic Lookups cannot be self-referring

In the example of the ‘Affected By’ field on the Contact, the Contact table itself cannot be selected as one of the tables available for selection. This is because the table cannot be the referencing and the referenced table at the same time.

6. Empty tables won’t appear for selection

Taking my example above of the ‘Affected By’ field allowing a user to select records from the Opportunity, Quote and Product tables, if any of those tables don’t have data, they won’t appear for selection but don’t worry the field has been created correctly. For example if my Quote table is empty, the lookup will show only 2 types of records can be selected (once you’ve added records to your table(s) they will show up):

So in summary…

Only create these fields if absolutely necessary as there is an element of ongoing admin that comes with them and they are strictly speaking not supported (yet!). So there you have it. Go crazy. But not too crazy… A big thank you to Josh Seddon for his feedback on living with polymorphic lookups! Your pain has not been in vain!

The Hidden Agenda of Rich Text Fields

I recently came across a disappearing act in D365. I had a rich text field on the form that end users expected to add images to (as above).

If users uploaded an image like the dog within the box (not dragged/dropped from a webpage as that will just store the URL not the actual image file) and saved the record, the image *poof* disappeared from the box as if it had never been added. No errors, no warnings, no dog.

Please Note: You will also have the same problem if you have a plain text/text area field (as opposed to the new rich text field options – see below) and have the Rich Text Editor control added on top of it.

There is ‘Plain text’ and then there is ‘Rich text’ …..
…and then there is the Rich Text Editor control that you can apply to a ‘plain text’ field to jazz it up to pretend to be a rich text field.

I started digging around and found out that if you add an image into a rich text field, the system is actually using a secret little table in the background called, you’ll never guess, Rich Text Attachment. The tabel schema is msdyn_richtextfile. This table has a column/field within it called, gasp, Image Blob!

Don’t let the name fool you – this data is not stored in Azure Blob Storage, this is all stored in Dataverse so beware of the storage implications of having lots of big rich text fields for everyone to capture their life story. Note that the character limit might also need to be quite high as the system stores rich text – i.e. for the example above what is actually stored in the field within Dataverse is the following:

Scenario 1: File uploaded (Rich Text Attachment record is created)

What gets stored in the field is the following:

<div style="font-size:9pt;font-family:'Segoe UI', 'Helvetica Neue', sans-serif;"><div>Nancy is a wonderful fictional character, couldn't ask for more. She has a dog, isn't he ADORABLE?</div>
<div>&nbsp;</div>
<div><img alt="" loading="lazy" src="/api/data/v9.0/msdyn_richtextfiles(56dbcf68-2c1a-ed11-b83e-000d3a381d58)/msdyn_imageblob/$value?size=full" style="height:186px;width:330px;"></div></div>
(I do take slight offence to the loading being refered to as ‘lazy’!)

Scenario 2: Image drag/dropped from a website (Rich Text Attachment record is NOT created)

In this case the image will appear same as above, but the difference is in what gets stored…

Here is what we get in this scenario- notice that after ‘img alt’ we get aaaaaall the details in the world about this photo, where it came from and who its uncle is…

<div style="font-size:9pt;font-family:'Segoe UI', 'Helvetica Neue', sans-serif;"><div>Nancy is a wonderful fictional character, couldn't ask for more. She has a dog, isn't he ADORABLE?</div>
<div>&nbsp;</div>
<div><img alt="What is your dog's lifespan? A Princeton geneticist is seeking the keys to  canine health and longevity." class="KAlRDb n3VNCb" id="imi" src="https://www.princeton.edu/sites/default/files/styles/half_2x/public/images/2
022/02/KOA_Nassau_2697x1517.jpg?itok=iQEwihUn" style="height:183px;margin:0;width:325px;"></div></div>

Therefore consider the character limit of each different type of field. A ‘Single line of text’ or ‘Text area’ field has a limit of 4,000, a ‘Multiple lines of text’ field has a limit of 1,048,576 – that is quite the difference.

Here is the Fun Fact: if you want an end user to use rich text fields that save images, the user needs to have the relevant privileges based on the use case (create/read/write) to the Rich Text Attachment table, otherwise they will witness a disappearing act because they ain’t privileged. *Poof*. There goes another one. You have been warned.

If you are wondering what the Rich Text Attachment record that gets automatically created looks like, the image you add appears as the round profile image that you would also see on e.g. a Contact record:

Ahhh it all makes sense now!

The form is very minimal (as I imagine no one expects anyone to surface this in the UI) but there is a lot of information stored on there like the parent entity this attachment relates to and its ID – so lots of cool things live in there!