Polymorphic Lookups and Where to Find Them

Oh Look! Tables!

Lets start at the beginning – lookup fields you probably know (a field (column) in one table that looks up to another table like a field on a Contact record that allows you to select an Account record as the ‘Employer’ for example) but what is this fancy ‘polymorphic’ thing? WELL. You’re in for a treat.

Polymorphism Explained

A polymorphic lookup field is a lookup field that allows you to select a record from more than one table therefore ‘morphing’ into many (poly!) tables. What can I say, it sounds fancier than ‘Multi-Table Lookup’ so there.

These fields exist out of the box in many places like the Appointment form for example – if you take a look at the ‘Optional Attendees’ you can see it is looking at 5 different types of records (i.e. 5 different tables). Congrats, you polymorphed!

How to Create One

You will be forgiven for thinking you can’t create such fields as you can’t create one through the maker portal (yet!) – only a standard (link to a single table) lookup or a Customer lookup giving you the ability to link to the Contact/Account tables exists:

Buuuuut…. you can create (and manage) one through the wonderful XrmToolbox using the Polymorphic Lookup Creator tool created by Tanguy Touzard! Power to the C#!

My guess is that in one of the future releases this functionality will pop up as polymorphic lookups are extremely useful – but until that day, proceed with caution. As this is a third party application, this isn’t fully/officially/100% supported or incorporated into out of the box functionality as you might expect.

What you need to do

The Polymorphic Lookup Creator tool is very easy to use – just remember that the ‘greyed out’ fields are actually editable and you’ll be fine 🙂 Below I am creating a new field on the Contact called ‘Affected By’ where I want to select a record from either the Opportunity, Quote or Product table.

On the left I have selected the solution I want the field created in, which table it should be created in, what I want to do (create a new field), the display name, schema name and finally I can tick the tables I want made available for it. By selecting a table from the list you can also see the details of the relationship to be created on the right and amend this as needed.

Once you are ready, click on the ‘Create Polymorphic Lookup’ button on the top right and, as Tanguy would say, Voila! Once the field has been created you will get a confirmation message and you can then see it in the maker portal within the solution and table you selected:

But Beware…

There are a few things that will not be what they seem – consider each of these carefully:

  1. The Maker Portal will lie to you

If you look at the field within the solution in the maker portal, even though it is polymorphic it will look like a normal lookup field linked to only the first table so you will have no idea or indication it is indeed a polymorphic one (so document your polymorphic lookups, make sure eeeveryone knows about it!):

2. Your solution import might fail

When the tool creates the new polymorphic lookup in your solution, it will add the field and its relationships as well as the related tables and their relationships to the solution (all good so far). The problem is that if the tables are not flagged in the solution to include their metadata, the relationship metadata won’t be part of the solution and the whole thing will fall over due to missing dependencies (not so good). If you have this problem you will need to remove and re-add the tables to the solution and don’t forget to tick the all important tick box in the process:

3. You will need to use the XrmToolBox to add/remove tables

Following on from point 1 above, you won’t be able to use the maker portal to make any changes to the field’s tables – you will need to open the field through the Polymorphic Lookup Creator tool, make any changes you need (be aware of data stored in the system if you remove a table from the list of selected tables) and then click on ‘Apply Changes’ at the top (or Delete to remove it all together – make sure no dependencies exist):

4. Cloud Flows will need Switching

If you do wish to use a polymorphic lookup in a cloud flow to get data or otherwise, be prepared for the use of the ‘Switch’ control based on the table the associated record is from before you can do anything else with it. There is a limit of 25 switches but in all honesty I would really worry about you if you create a polymorphic lookup that uses more then 5 tables let alone 25…

5. Polymorphic Lookups cannot be self-referring

In the example of the ‘Affected By’ field on the Contact, the Contact table itself cannot be selected as one of the tables available for selection. This is because the table cannot be the referencing and the referenced table at the same time.

6. Empty tables won’t appear for selection

Taking my example above of the ‘Affected By’ field allowing a user to select records from the Opportunity, Quote and Product tables, if any of those tables don’t have data, they won’t appear for selection but don’t worry the field has been created correctly. For example if my Quote table is empty, the lookup will show only 2 types of records can be selected (once you’ve added records to your table(s) they will show up):

So in summary…

Only create these fields if absolutely necessary as there is an element of ongoing admin that comes with them and they are strictly speaking not supported (yet!). So there you have it. Go crazy. But not too crazy… A big thank you to Josh Seddon for his feedback on living with polymorphic lookups! Your pain has not been in vain!

Lookup Fields (Columns!) and Advanced Options – a Maker Portal Exclusive

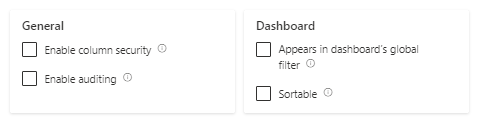
The Power Platform maker portal is wonderful except for this little thing to do with lookup fields (columns!) and advanced options. For the purposes of my sanity I will continue to call them fields for this post. Sorry not sorry. Old habits die hard.

It appears that if you use the maker portal to create a lookup field in a solution (as indeed you should – if you are still using the old UI, we need to talk) then there is the small matter of the fact that by default, auditing for that field (and any other such settings) will be disabled. When creating a lookup field, the ‘Advanced Options’ section doesn’t show any options for auditing or field level security or anything else that appears for other fields:

Look at all that empty space…

I don’t know why these options are not available when you are creating the field (if you do, let me know!) but effectively this means that if you create a lookup field in the maker portal and you want it to be audited or change any such groovy settings you need to create the field, save it then open it again as then the magical settings appear! Notice how they are all unticked…

Well I never!

So rememeber to do this, otherwise your auditing history will be short on lookup field action… Crazy stuff.

The Hidden Agenda of Rich Text Fields
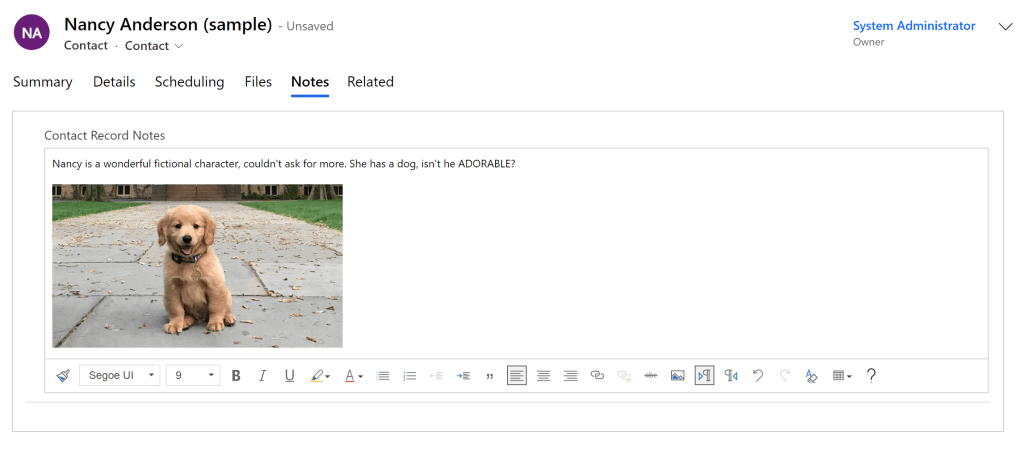
I recently came across a disappearing act in D365. I had a rich text field on the form that end users expected to add images to (as above).

If users uploaded an image like the dog within the box (not dragged/dropped from a webpage as that will just store the URL not the actual image file) and saved the record, the image *poof* disappeared from the box as if it had never been added. No errors, no warnings, no dog.

Please Note: You will also have the same problem if you have a plain text/text area field (as opposed to the new rich text field options – see below) and have the Rich Text Editor control added on top of it.

There is ‘Plain text’ and then there is ‘Rich text’ …..
…and then there is the Rich Text Editor control that you can apply to a ‘plain text’ field to jazz it up to pretend to be a rich text field.

I started digging around and found out that if you add an image into a rich text field, the system is actually using a secret little table in the background called, you’ll never guess, Rich Text Attachment. The tabel schema is msdyn_richtextfile. This table has a column/field within it called, gasp, Image Blob!

Don’t let the name fool you – this data is not stored in Azure Blob Storage, this is all stored in Dataverse so beware of the storage implications of having lots of big rich text fields for everyone to capture their life story. Note that the character limit might also need to be quite high as the system stores rich text – i.e. for the example above what is actually stored in the field within Dataverse is the following:

Scenario 1: File uploaded (Rich Text Attachment record is created)

What gets stored in the field is the following:

<div style="font-size:9pt;font-family:'Segoe UI', 'Helvetica Neue', sans-serif;"><div>Nancy is a wonderful fictional character, couldn't ask for more. She has a dog, isn't he ADORABLE?</div>
<div>&nbsp;</div>
<div><img alt="" loading="lazy" src="/api/data/v9.0/msdyn_richtextfiles(56dbcf68-2c1a-ed11-b83e-000d3a381d58)/msdyn_imageblob/$value?size=full" style="height:186px;width:330px;"></div></div>
(I do take slight offence to the loading being refered to as ‘lazy’!)

Scenario 2: Image drag/dropped from a website (Rich Text Attachment record is NOT created)

In this case the image will appear same as above, but the difference is in what gets stored…

Here is what we get in this scenario- notice that after ‘img alt’ we get aaaaaall the details in the world about this photo, where it came from and who its uncle is…

<div style="font-size:9pt;font-family:'Segoe UI', 'Helvetica Neue', sans-serif;"><div>Nancy is a wonderful fictional character, couldn't ask for more. She has a dog, isn't he ADORABLE?</div>
<div>&nbsp;</div>
<div><img alt="What is your dog's lifespan? A Princeton geneticist is seeking the keys to  canine health and longevity." class="KAlRDb n3VNCb" id="imi" src="https://www.princeton.edu/sites/default/files/styles/half_2x/public/images/2
022/02/KOA_Nassau_2697x1517.jpg?itok=iQEwihUn" style="height:183px;margin:0;width:325px;"></div></div>

Therefore consider the character limit of each different type of field. A ‘Single line of text’ or ‘Text area’ field has a limit of 4,000, a ‘Multiple lines of text’ field has a limit of 1,048,576 – that is quite the difference.

Here is the Fun Fact: if you want an end user to use rich text fields that save images, the user needs to have the relevant privileges based on the use case (create/read/write) to the Rich Text Attachment table, otherwise they will witness a disappearing act because they ain’t privileged. *Poof*. There goes another one. You have been warned.

If you are wondering what the Rich Text Attachment record that gets automatically created looks like, the image you add appears as the round profile image that you would also see on e.g. a Contact record:

Ahhh it all makes sense now!

The form is very minimal (as I imagine no one expects anyone to surface this in the UI) but there is a lot of information stored on there like the parent entity this attachment relates to and its ID – so lots of cool things live in there!